Author Topic: **The OFFICIAL Redemption Table Simulator (RTS) User Guide.**  (Read 57197 times)

Lamborghini_diablo

  • Guest
  • Trade Count: (0)
**The OFFICIAL Redemption Table Simulator (RTS) User Guide.**
« on: August 20, 2008, 11:15:22 AM »
+8
Welcome to the official guide to Redemption Table Simulator! This guide will cover just about everything you could possibly need to know about the program, including: installing it, updating it, and how to use it. If you have any questions or comments, please post them here.

Thank you, and enjoy your stay.

-Lambo, Caretaker of the RTS board.


****Table of Contents****

Click the links to be magically teleported to each topic.

Installation: Step 1. (Also used for updates)
   Step 1
Installation: Step 2.
   Step 2
Part 2: How to Use RTS.
   The Interface.
   The Menus.
   The Deckbuilder.
   Connecting in RTS
Part 4: Credits
« Last Edit: January 08, 2011, 11:18:37 PM by Lamborghini_diablo »

Lamborghini_diablo

  • Guest
  • Trade Count: (0)
Install Method 1
« Reply #1 on: August 20, 2008, 11:15:50 AM »
+2
****Installation Step 1 AND/OR Updating****

First, download  this .zip file. Now, open the file and Copy the RTS folder onto your desktop (not necessary, but makes it easier to find)

Now, you can leave the folder right on your desktop and play it from there…. Or you can put it where the Installers normally place it. If you choose to be all organized, follow the following steps:

1. Open My Computer:
2. Go to C Drive:


3. Go to Program Files:


If you already had RTS installed and have decks (or other unique files you have in there, like custom expansion packs) saved, go into the RTS folder in here and copy your files. Go back to the RTS file on your desktop and paste them into there.

Now, move the new RTS folder that is on your desktop into Program files. For those who already had it installed and have moved all files they wanted to keep out of their old RTS folder, click yes when it asks to replace the folder.

If you want a desktop shortcut, right click on the RTS program and hit “Send to:” > “Desktop (Create Shortcut)”

There you go! You now have a fully functional, fully updated copy of RTS!

If you get some error messages, see the last half of the next topic.

Return to Table of Contents.
Next Topic: Installation Method 2
« Last Edit: January 27, 2013, 12:16:36 PM by Lamborghini_diablo »

Lamborghini_diablo

  • Guest
  • Trade Count: (0)
Installation Method 2
« Reply #2 on: August 20, 2008, 11:16:03 AM »
+2
****Installation Step 2****
Now, try to run RTS. If you get an error message, follow the Hitchhiker’s Guide to the Galaxy and Don’t Panic! This is normal for when you first install it, as there are other files you need to run it as well. Your error message will most likely tell you that it requires a certain file to run. Check which of the following files it needs, and download them. After downloading each required file, simply run the program and will install the missing file. Repeat with all the files it requires until RTS finally opens.

Visual Basic 6.0 Runtimes (msvbvm60.dll) (follow the instructions on the Microsoft website)

*EDIT* The original Microsoft link above is down. Try this one instead:

http://www.microsoft.com/downloads/details.aspx?displaylang=en&FamilyID=bf9a24f9-b5c5-48f4-8edd-cdf2d29a79d5

I have not tested it myself, but it is visual basic 6.0, so it should work.

MSWINSCK.OCX
RICHTX32.OCX
MSCOMCTL.OCX
COMDLG32.OCX

Now, RTS should be up and running!

Return to Table of Contents.
« Last Edit: December 31, 2010, 07:16:04 PM by Lamborghini_diablo »

Lamborghini_diablo

  • Guest
  • Trade Count: (0)
RTS: The Interface
« Reply #3 on: August 20, 2008, 04:58:21 PM »
+2
****RTS: The Interface****

Welcome to RTS! When you open up the program, you will see the following screen:
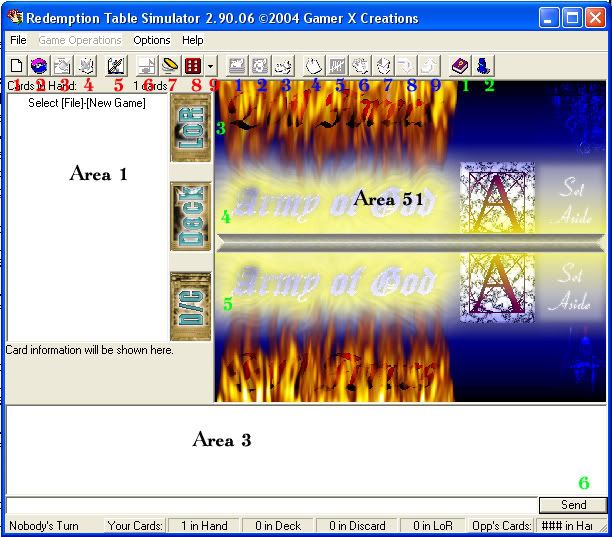


Now, I will go over each of the various numbers:

1. New Game. This starts a new game.
2. Reconnect. Use this if you loose connection with your opponent.
3. Restart Game. Want a rematch?
4. Disconnect. This closes the connection.
5. Deck Editor. See two topics down for details.
6. Ping Opponent. This is one of those rarely used functions. You can ignore it.
7. Coin Flip. The computer does a randomized coin flip.
8. Roll Die. Roll a dice.
9. This dropdown menu picks how many sides the die in Red 8 have.
1. Draw 1 card from the top of your deck.
2. Draw 3 cards from the top of your deck.
3. Ends your turn.
4. This lets you add a note to a card, like if it was converted or something.
5. Adds a counter to a card. Useful for set asides.
6. Sends the selected card to your hand.
7. Sends the selected card to the discard.
8. Moves the selected card down in a stack of cards.
9. Moves the selected card up in a stack of cards.
1. Brings up the manual.
2. Info about RTS and who made it.
3. This button lets you view your Land of Redemption.
4. This button lets you manipulate your Draw pile in the following ways.
   Draw 1
   Draw 3
   View: Top card, Top 3 cards, Entire deck.
   Shuffle.
   Discard top card.
5. This button lets you view your discard pile.
6. This button sends a message you have typed. Pressing enter while typing in the bottom does the same thing.
Area 1: this is your hand.
Area 51: This is the Table.
Area 3: This is the chatbox.

Right clicking cards bring up many importiant options as well, and the options depend on where the card is.

**In Hand**
Put in Play: this lets you place the card onto the table either face up or face down.
Send to: Lets you stuff the card into your deck or discard it.

**In play**
Flip Over: Flips the card over.
Counters: Lets you manage counters on the card.
Make Note: Already disscussed above.
Send To: Similar to the Send To in your hand, but you now have the option to put it back in your hand, or into your own or your opponents Land of Redemption.
Remove Card. Takes the card out of the game. WARNING: This CAN NOT be undone.
Relenquish Control. Gives the card to your opponent.

**In Deck or Discard**
Send To: Already discussed.
In your opponents deck, you have the added option to discard the selected card.
View Card. Lets you see what the card does.

**In Land of Redemption**
Send Card To: This time its a little different. You can only put it back in play, but you can choose who the card belongs to when you do.

Well, thats the Interface of RTS!

Return to Table of Contents.
Next Topic: RTS: The Menus
« Last Edit: August 08, 2009, 12:18:32 AM by Lamborghini_diablo »

Lamborghini_diablo

  • Guest
  • Trade Count: (0)
RTS: The Menus
« Reply #4 on: August 20, 2008, 04:58:46 PM »
+2
****RTS: The Menus****

Ok, now that you know what all the various buttons do in the main window, it’s time to learn what is available in the menus. Some of these will be familiar from above, and I will put a * after the number.


FILE
1. * New Game,
2. * Reconnect
3. * Reset
4. * Disconnect
5. * Deck Editor
6. Quit. This exits RTS.

GAME OPERATIONS
1. * Draw 1
2. * Draw 3
3. Your Cards. This gives you the option to view all of your cards in various places, including: Deck, Discard, and Land of Redemption.
4. Opponents Cards: This is a VERY useful option. Use this when you need to view any these areas, but on your opponents side: Hand, Deck, Discard Pile, Land of Redemption.
5. * Probability.
6. * End Turn.

OPTIONS
1. Background. This lets you change the image you see in the background of the “Table.” If you want to reset to the original one, just click Reset to Default.
2. Card Graphics. This lets you pick between using card images and text.
3. Mini Cards. Even though I’m the one making the guide, I have absolutely no clue what these are. Ignore this unless you know what it does.
4. Ignore this as well, more “minicards”
5. Confirm Removal. When this is checked, it brings up a question making sure you want to remove a card from the game. I recommend you leave it checked incase you misclick.
6. Custom Expansions. This lets you add custom made expansions.
7. Show Shortcut Bar. This shows the list of icons I went over on the top of the screen in the previous topic.
8. Update Checking. As far as I know, this does not work. Ignore.

Help simply has the Manual and About.

And those are the RTS Menus and what each of them do!

Return to Table of Contents.
Next Topic: RTS: The Deckbuilder
« Last Edit: August 20, 2008, 05:27:18 PM by Lamborghini_diablo »

Lamborghini_diablo

  • Guest
  • Trade Count: (0)
RTS: The Deckbuilder
« Reply #5 on: August 20, 2008, 04:58:56 PM »
+2
****RTS: The Deckbuilder****

Ok, this arguably the most important section of RTS. This is where you build and save your awesome decks. Lets take a look at it.


Ok, First thing you will notice is that the left side starts off empty.  This is where your deck is.  To start building your deck, simply click anywhere in the card list on the right, and begin searching for cards by starting to type in the name. Example. Just type “Son” and it will go down to all the various Son of God cards.

When you find a card you want to add, simply click the button labeled 1 in the picture, press enter, or double click the card on the right. To remove a card, you must press the button labeled 2. Now, once you’ve built your masterpiece, you can go ahead and click on  File. This gives you some options.

1. New Deck. This clears the deck area.
2. Load Deck. This opens a previously saved deck.
3. Save Deck. This saves the current decklist you have in the editor. The default save spot is in the RTS folder.
4. Create Deck Summary. This is a useful little tool. It recreates your deck in a much easier to display way. You can hit the “Copy to Clipboard” and paste the whole decklist into something like AIM or the forums.
5. Quit. Exits the Deck Editor.

And that’s about it for the deck editor! Now get going on building the next Nationals winning deck.

Return to Table of Contents.
Next Topic: Connecting in RTS
« Last Edit: August 20, 2008, 05:28:25 PM by Lamborghini_diablo »

Lamborghini_diablo

  • Guest
  • Trade Count: (0)
Connecting in RTS
« Reply #6 on: August 20, 2008, 04:59:06 PM »
+2
****Connecting in RTS****

-----------IMPORTANT EDIT----------

JULY 2012 UPDATE: This way of connecting will no longer be available at the end of July. Please refer to the Hamachi instructions below.

A new way to connect to other players has been created by one of the members of this forum, Lord Zardeck. Due to being fairly busy with college at the moment, There will be a very short guide on how to use this system. I will expand this section when I get some free time. Connecting through hamachi does still work, but many players are switching to the new system.

http://play.redemptionconnect.com/

Go to the link above, and create a new account on the Redemption Connect site if you have not already visited the site before.

Once you are signed in, you will see a lobby screen, and you will automatically join the Global room. Next, click "create room" or join a room that already exists. Once you are in the room, open RTS, and both players should use the connect option. Click "Start Game" once you are in a lobby to see what information goes where.

Both players will then connect to the server, rather than to each other. Once both players are connected, have fun playing!

As said before, I will expand section this when I have some free time. If you have something specific you would like me to add, send me a PM.

-----------IMPORTANT EDIT----------


This can be tricky depending on how your computer is connected to the internet. Some people have the ability to host games without needing other programs to assist them. These people can do this because they don’t have either a Firewall or a Router. If you think you might have one of these, there is another way to host called Hamachi.

To get Hamachi, go to this website and follow the directions to download it: https://secure.logmein.com/products/hamachi/download.aspx

Now, installation may be tricky depending on what security you have. Some people have no problems, while others run into many. I am not sure what causes this so I can’t really explore it further on here. If you run into issues, just ask what to do in the RTS question thread.

Before you can connect to people on Hamachi, you must be on the same network as them. Talk to them and figure out what networks they are on and join one, or have them join yours.

Now, once are able to host / find someone who can host… here is what you do.

Press New Game.
Pick your username at the bottom.
Pick your deck.
***If you are the host***
Make sure Host the Game is selected and press Listen. RTS will then wait to receive a signal from another person trying to connect to you.
***If you are connecting to the host***
Make sure Connect to the Host is selected. Now you must find the I.P. address of the host. If the person is hosting without Hamachi, just ask them for it and they will give it to you. If you are connecting through Hamachi, find them in Hamachi and right click their name. The option “Copy Address” should be available. Click it. Go back to the New Game window and paste the IP address into the bar. Now press Connect.

If all goes well, you should be greeted to a hand full of eight cards. Happy gaming!


Return to Table of Contents.
Next topic: Credits
« Last Edit: June 21, 2013, 12:34:33 PM by Lamborghini_diablo »

Lamborghini_diablo

  • Guest
  • Trade Count: (0)
Credits
« Reply #7 on: August 20, 2008, 05:19:44 PM »
+2
****Credits****

Thanks go out to:
God for everything.
Cactus Game Design for creating Redemption.
Gamer X for creating RTS.
Schaef for assisting me with several files and granting me Moderator status.
Everyone here for being such a great community.

Return to Table of Contents.
« Last Edit: May 09, 2010, 01:06:51 PM by Lamborghini_diablo »


SimplePortal 2.3.3 © 2008-2010, SimplePortal